04 June 2023

For My Queen Bee - Lawn Fawnatics Challenge #149

Hey there, It's been so long since my last post and a lot has changed in my life but the on e thing that hasn't is my love of all things Lawn Fawn. Today I am sharing an card which I am entering into the current challenge over at the 

The current challenge is a "Die only" theme, which I am really digging as I just received lots of new dies.


I used the following products to create my card:

- Magic Iris Beehive Add-on Dies

- Honeycomb Stencil

- Henry's ABC's Dies

- Jessie's ABC Stamp Set

- Pearlescent Vellum

- Stitched Rectangle Lawncuts Dies


I started by cutting a rectangle using one of the stitched rectangle Lawn cuts. I then used the Honeycomb stencil to  add a pattern in 3 places.

I die cut all of the images from coloured cardstock and added a little ink blending. The honeycomb was created by adding 3 shades of yellow, orange and brown ink over a yellow die cut honeycomb. I then added inky splatters in brown and white ink.

The stamped sentiment was white heat embossed onto black card and the die cut word was cut from yellow and ink blended, splattered and then mounted onto a black die cut to create a dropped shadow.


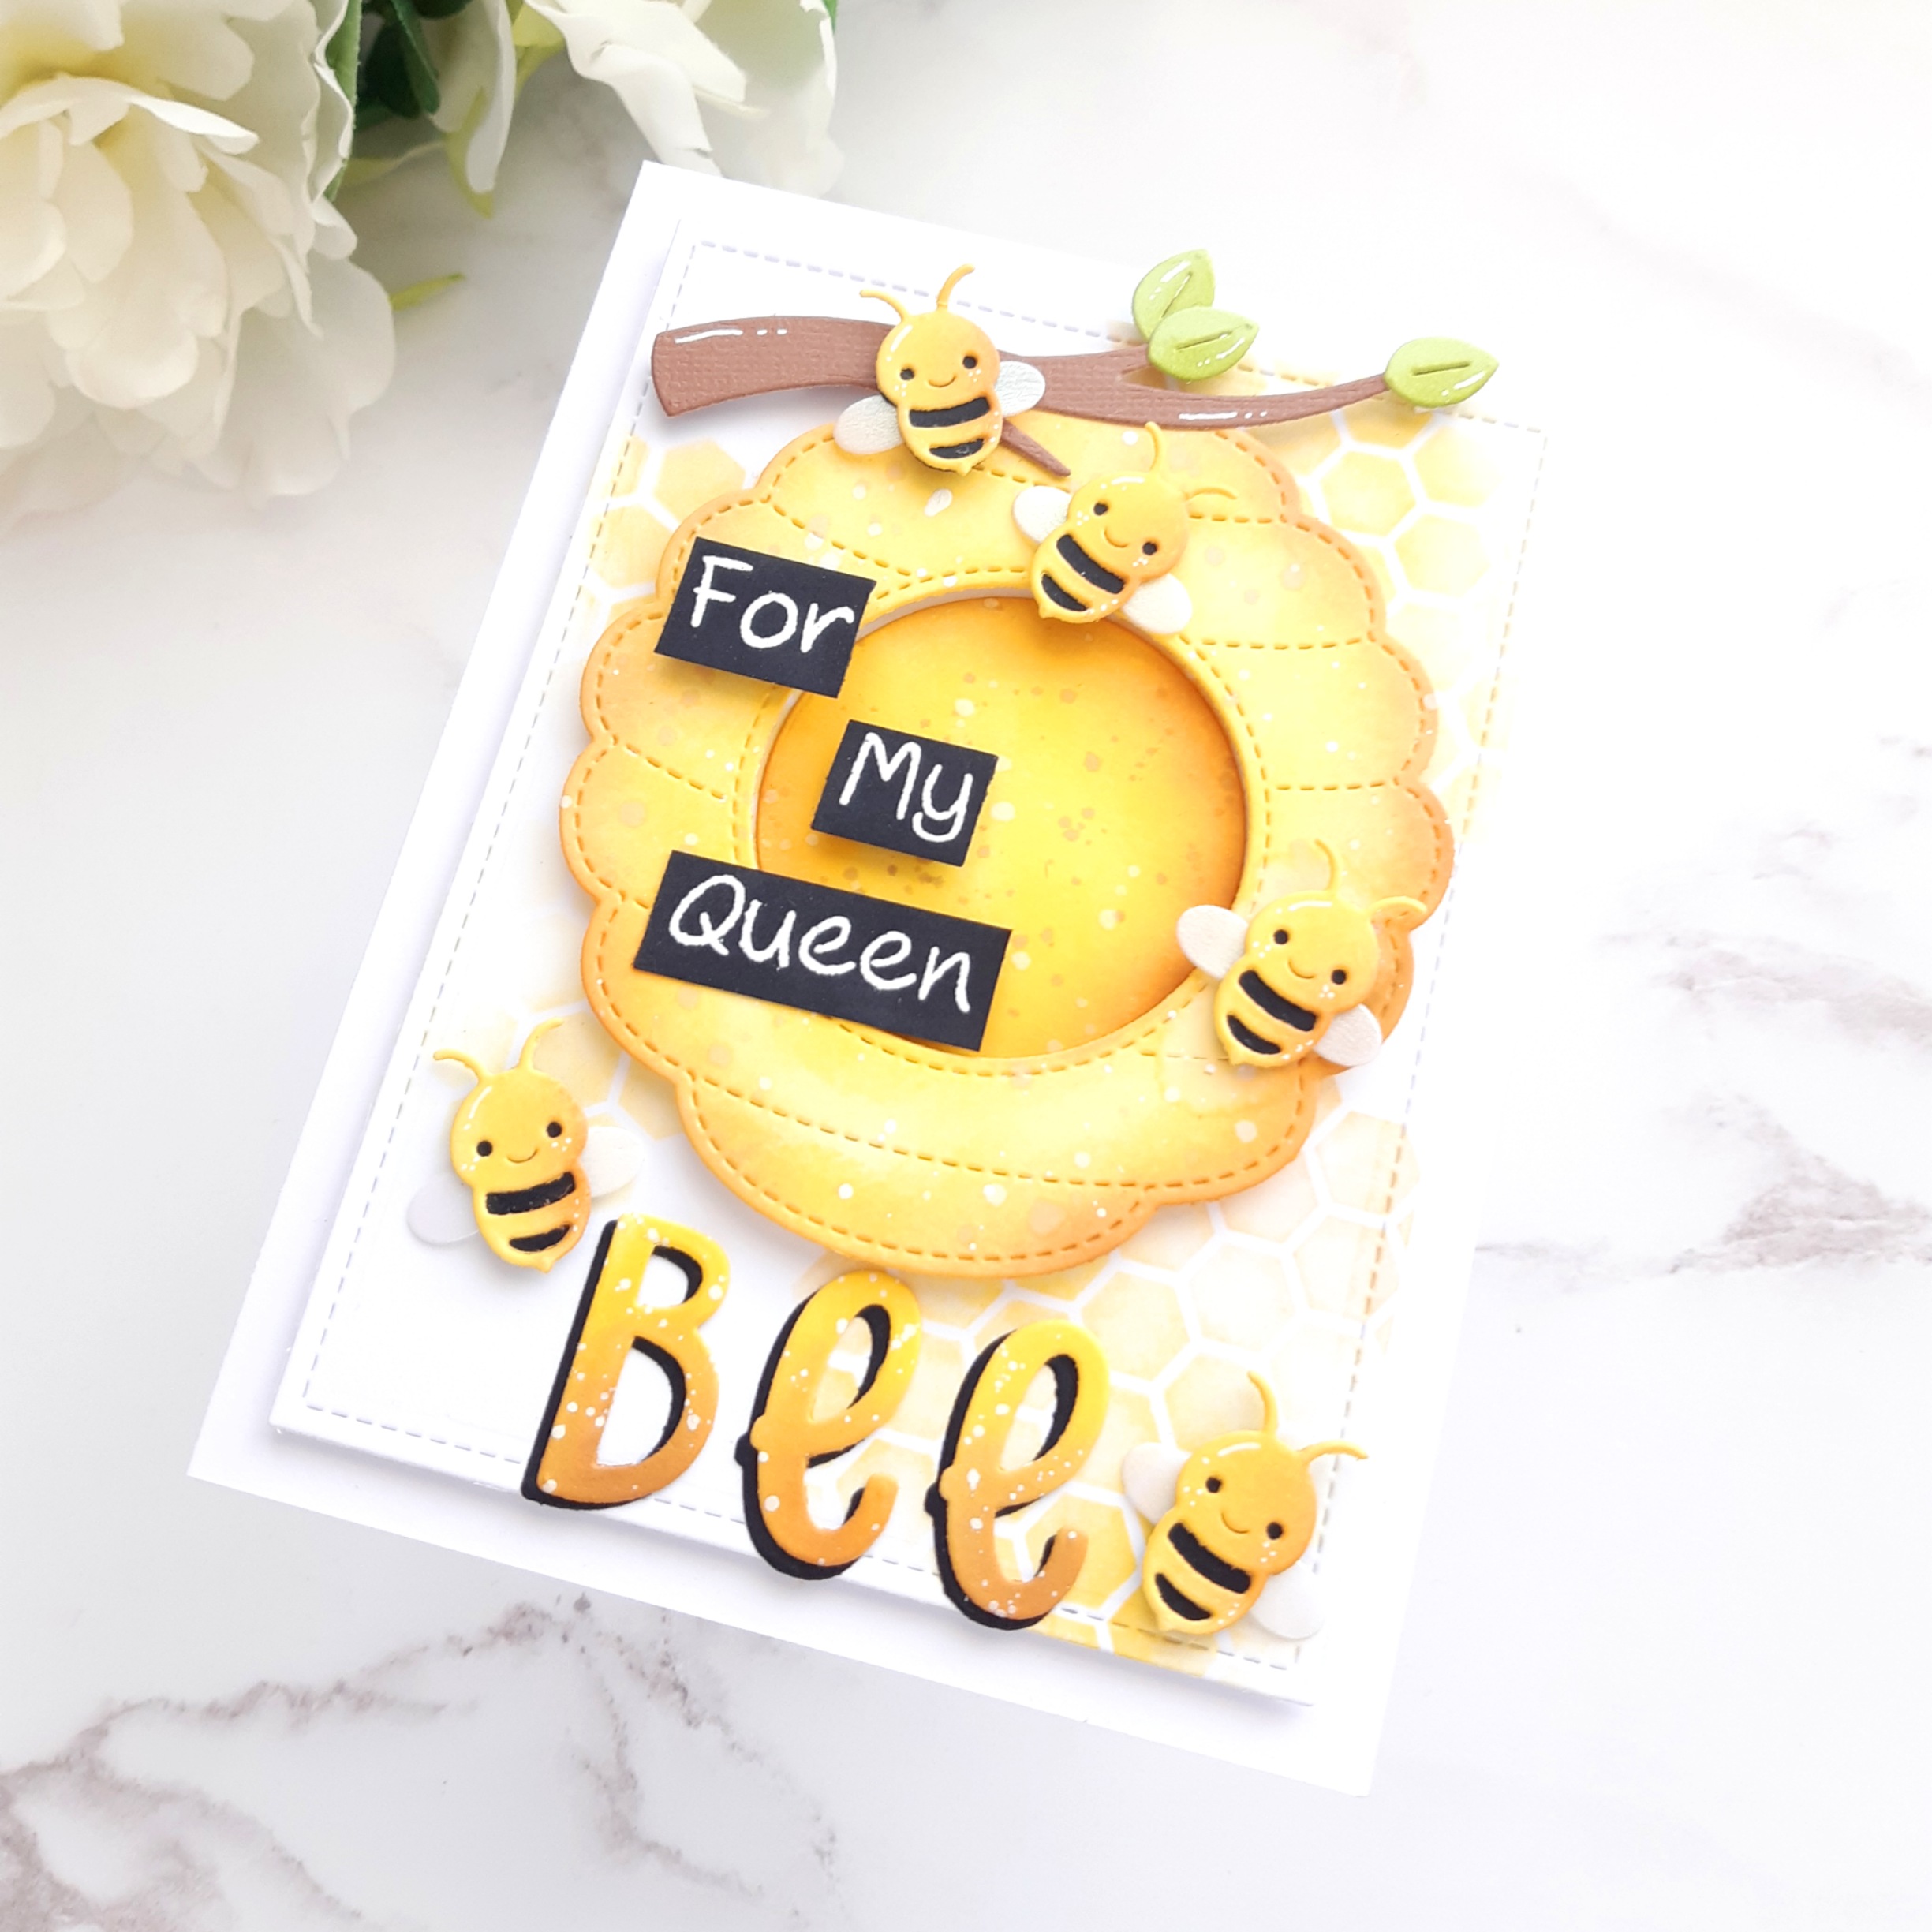
I cut the bees from yellow and black card, added some light ink blending before placing pearlescent vellum wings Beneath. All images had some highlights added with a white gel pen.

I used a brown textured cardstock to cut the branch and added a few green die cut leaves, which once again I added a little ink blending to.

I adhered the stencilled rectangle onto an A card base and then used various thicknesses of foam tape to add all of the die cut elements.

I am so happy with how this card turned out, next time I will turn it into a magic iris.


02 February 2023

Altenew February 2023 Boho Chic Stamp, Die, Stencil & More Release Blog Hop #2 + Giveaway ($300 in Total Prizes!)


Hello and welcome to the February Boho Chic collection hop and giveaway from Altenew. I am super excited to be part of the hop (it's been a while). You should have arrived here form Michelle Short's blog, if not you can go back to the start of the hop at anytime by visiting the Altenew Blog.

The new release is available in store to purchase here Boho Chic CollectionThis month, Altenew are introducing ENSEMBLES! What is an ensemble? Get ready to take your projects up a notch this month with our new ensembles! Our specially designed collections of coordinating products make putting together the perfect crafting project effortless. Go wild and mix and match for an even more unique look, or select one complete ensemble for maximum impact – however you choose to use them, we can't wait to see what kind of creative magic you come up with!


Boho Decor Ensemble.


I stamped the Arrow from the Boho Arrow Stamp Set onto Neenah Solar Crest cardstock and used my Altenew Artist Markers to colour it. I then die cut it using the Boho Arrow Die. I added the die cut to a panel which was embossed using the Masonry Wall 3D Embossing Folder. I then added a stamped sentiment and a few Essential Black and White Enamel Dots.


Using the Boho Vases Die Set, I cut the Leaves/Plants from coloured cardstock and added some shading with Altenew Artist Markers. I then cut the vases from lilac cardstock and added purple shading. I embossed a piece of yellow card using the Masonry Wall 3D Embossing Folder and added it behind the vases on a white card base. I then stamped a sentiment from the Boho Arrow Stamp Set in black ink.


Patchwork Motifs Ensemble.


Using the Patchwork Tiles Builder Stencil Set I added ink in two colours to a piece of white card. I then used the detailed stencil to add iridescent glitter paste. Once dry I trimmed the panel and added it to a white card base. I then added a sentiment using the Fancy Yay Die cut from both pink and gold glitter card, I stacked them with a minimal drop shadow.


Using the Patchwork Tiles Builder Stencil Set I added Lilac and turquoise ink, I then used the Patchwork Tiles Stamp Set to add the stamped detail layers. I added the sentiment using the Versatile Greetings Bundle on top of a torn piece of vellum. To finish I added a few white enamel dots from the Essential Black and White Enamel Dots collection.


Geranium and Buttercups Ensemble.


I started by using the Swamp Buttercup Layering Stencil to create the Buttercup image and then cut it using Swamp Buttercup Die. I created the background by cutting the Rattan Stripes Die twice from Kraft card. I added a sentiment using the One Go Birthday Bundle and then placed a scattering of Fall Harvest Enamel Dots.


Enamel Elements Ensemble.


I created a background using the Decorative Enamels Die Set. I then added sentiments form the Bold Sentiments Stamp Set. I used the sentiments to secure some black twine and the added some Essential Black and White Enamel Dots.


My final card uses the Enamel Flowers Stamp Set, I added colour to the image using the Enamel Flowers Stencil Set. I cut them with the Enamel Flowers Die Set and added them to a white A2 card. I then added the black frames using the Fine Frames Rectangles Die. I then cut the sentiment using the Be Kind Die and adhered this over the frame. Lastly I added a few Sea Shore Enamel Dots


This release is out of this world stunning. There's so much variety, something for everyone. I hope you enjoy it as much as I have.

Giveaway Prizes:

$300 in total prizes! To celebrate this release, Altenew is giving away a *$100 gift certificate to 1 lucky winner and a $20 gift certificate to 10 winners! Please leave a comment on the Altenew Card Blog and/or each designer’s blog post on the blog hop list below by 02/08/2023 for a chance to win. Altenew will draw 11 random winners from the comments left on each stop of this blog hop and announce the winners on the Altenew Winners Page on 02/09/2023.

*The winner of the $100 gift certificate will be chosen from comments left on the Altenew blog.


Your next stop is Erum Tasneem


Please note that I have not used all items from all ensembles and I have also used some products from previous releases. Items were gifted to me as part of my design team work.

You are invited to the Inlinkz link party!

Click here to enter

14 November 2022

November 2022 Trailblazing Inks Release + Giveaway ($300 in Total Prizes!) | Dye inks with a brand new look and adjusted formula


Welcome to the Trailblazing Inks release blog hop and giveaway. I am super excited to be sharing two projects with you, featuring the new ink pads. First off, you should have arrived here from Michelle Short, If not you can use the links at the bottom of this post to navigate.


My first card features the Woodland Escape Fresh Dye Ink Bundle. This bundle is my all time favourite (for now at least) I used all four ink pads to add an ombre blend over a piece of Neenah solar crest cardstock that had been sptirzed with Ranger Distress Spray.

I used the Tropical Jungle Stamp to heat emboss onto a piece of vellum using Crisp White Embossing Powder and an Embossing Ink Pad. I then cut the image using the Tropical Jungle Die Set and adhered it to a piece of Brushed Copper Metallic Cardstock that I cut using the die. I allowed some of the vellum to stand away from the metallic cardstock to give dimension.

I then added a sentiment using the Sweet Sentiments Die Set. I cut the base layer from white cardstock and the detailed layer from Brushed Copper Metallic Cardstock. I added this to my card using foam tape.


My second card features the Frosted Foliage Fresh Dye Ink Bundle and the Blue Mountains Fresh Dye Ink Bundle. These colors are so dreamy.

I used the Rose Blossom Stamp Set and did a whole ton pf masking to create the floral image. I then added inky splatters and a sentiment using the Bold Sentiments stamp set.

I can see these new ink pads being used a lot in my upcoming projects as they are stunning and the new formula ink doesn't bead up on the stamp surface, making stamp layering so much easier.

Your next stop is Seeka, before you go be sure to take a moment to check out the giveaway below.


Giveaway Prizes:

$300 in total prizes! To celebrate this release, Altenew is giving away a $50 gift certificate to 2 lucky winners and a $25 gift certificate to 8 winners! Please leave a comment on the Altenew Card Blog and/or each designer’s blog post on the blog hop list below by 11/19/2022 for a chance to win. 

Altenew will draw 10 random winners from the comments left on each stop of this blog hop and announce the winners on the Altenew Winners Page on 11/21/2022.


Blog Hop Participants

Altenew Blog

Jennifer McGuire

Bridget Casey

Virginia Lu

Michelle Short

Terri Koszler

Seeka

Therese Calvird

28 October 2022

Paperbabe Stamps New Release - Introductions day 2

Hello! Welcome to day two of Paperbabe Stamps Introductions. Today we have two products to share with you. 


Afro Curlies comprises of 7 nesting  hair dies, a die to create a slot to pop the head into. A head scarf, parted hair die, individual curls and a die that could be used to create Bantu Knots. This set really is so versatile and gives you so many creative options.


Curly Plate is exactly what it says; a plate that creates curl! Use it together with one of the large Afro dies to add texture. This is such a cool die.


I used the Afro Curlies die and the Curly plate to create the hair for my project. I used the Jointed Paper Art Doll Dies and stamps to add the head and torso. I gave her a little top using the Vintage Doll Paper Pad and the T-Shirt and Necklines Template,


I added white gel pen highlights to the face and head scarf and a tattoo to the neck. I kept the card simple, a fine line border and a stamped sentiment from the Flourish and Grow set and a few inky splatter.

All of the new items will be available to purchase tomorrow from The Paperbabe Stamps Store.

27 October 2022

Paperbabe Stamps New Release - Introductions Alessia and Choppy Bob

Hello Crafty Friends, I am super excited to be able to share a couple of projects with you for dau 1 of the introductions at Paperbabe Stamps.

These new Hair Dies have been designed to go along with the Jointed Paper Art Doll dies that were released a year or so ago.


This is Aleesia hair die, the most popular hair design in the template range. It can be used for the portrait and 3/4 view heads. It can be layered up very easily, to give lovely dimension as well as great snip-ability 


Here I cut the hair from Patterned paper and added some ink blending for a funky look. I used the Jointed Paper Art Doll Dies and stamps to add the head and torso. I gave her a little top using the Vintage Doll Paper Pad and the T-Shirt and Necklines Template,

I kept the card design simple by adding inky splatters, a fine line border and a sentiment from the Flourish and Grow stamp set.


This is Choppy Bob. There are six pieces in this design that can be used in a variety of ways, from layering or using parts in a unique way, change the parting and can also be used for the portrait and 3/4 view heads.


I used the Jointed Paper Art Doll Dies and stamps to add the head and torso. I gave her a little top using the Vintage Doll Paper Pad and the T-Shirt and Necklines Template, I cut the hair from coloured card and added a sparkle pen line to the cut details. I used alcohol markers to add colour to the face and body

I kept the card design simple by adding inky splatters, a fine line border and a sentiment from the Flourish and Grow stamp set.

Please stop by tomorrow for the introduction of some more new products. The new release will be available to purchase Saturday 29th October 2022.

20 October 2022

Altenew's Fairy Tale Florals Add ons - 3D Embossing Folder and Detailed Simple Colouring Stencil

Hey, there crafty friends, Terri here! Today, I am sharing 2 quick and simple cards using the NEW Fairy Tale Florals 3D Embossing Folder and Detailed Simple Coloring Stencil.  I adore the Fairy Tale Florals stamp and die set, so when Altenew released these add-on items, I was overjoyed. I'm always looking for new ways to stretch the items I own.

My first card uses a minimal color palette but has some added highlights thanks to Altenew's Gel Pens. The great thing about coloring stencils is that you can go as simple as you like, or you can step up your design by adding more colors or depth of shade.

Card #1

I used the Fairy Tale Florals 3D Embossing Folder to emboss a piece of Classic Crest Solar White 110lb Cardstock. I lightly sprayed the reverse with water before embossing — this helps to soften the fibers and allows for a deeper emboss. I then used the Detailed Simple Coloring Stencil to add Wisteria Ink to the flowers with the use of a Mini Ink Blending Brush. I also added some Citrus Burst Ink to the center of the flowers and then added Minty Mint to the leaves. I added metallic splatters using the Metallic Watercolor 14 Pan Set.

Quick and Simple Cards

The background was hot foiled using the Splatter Hot Foil Plate and Altenew's Brushed Gold Hot Foil Roll. While I had my hot foil machine out and heated up, I decided I would hot foil some sentiments from the Sweet Sentiments Hot Foil Plate and Die Set Bundle. The great thing about this set is that there is a coordinating die set that allows you to cut the foiled sentiment. You can also cut the sentiment into a two-part sentiment without hot foil if you wish.

Fairy Tale Florals 3D Embossing Folder and Detailed Simple Coloring Stencil

To assemble the card, I ink blended an A2 card base using Minty Mint Crisp Dye Ink. I then trimmed the Splatter Hot Foil panel to measure 4″ by 5.5″ and adhered this to the card base using Altenew's Ultra Sticky Double-Sided Tape. I decided to fussy cut around the embossed image and adhere it to the card using Instant Dimension Foam Tape.  I then added foam tape to the reverse of the sentiment and added it to the card.

To finish this quick and simple card, I decided to add White Gel Pen highlights to the flowers and leaves.

Card #2

My second card uses two colors for the flowers. I chose to keep the card very clean and simple, so it is easy to replicate. I again started by embossing onto Classic Crest Solar White 110lb Cardstock using the Fairy Tale Florals 3D Embossing Folder. To color the flowers, I used Blush and Sea Glass Crisp Dye Inks. I used the Mini Blending Tools to add the ink through the stencils, adding more color to the centers of the flowers and to the petals that were tucked behind others.

Quick and Simple Cards

I used Minty Mint Ink to ink blend the leaves; I like the leaves to be darker at the base and lighter at the tips. This is easy to achieve; I added more ink to the brush and used a heavier hand, which gives a beautiful effect. I added some metallic white inky splatters over the flowers and set them aside to dry.

Fairy Tale Florals 3D Embossing Folder and Detailed Simple Coloring Stencil

Using the Sweet Sentiments Hot Foil Plate and Die Set Bundle, I hot-foiled some of the sentiments in silver and used the coordinating dies to cut them out. I added some ink blended Blush Crisp Dye Ink to an A2 card base and then trimmed the embossed panel to 4″ by 5.5″ and adhered it with Instant Dimension Foam Tape. I then added the “Thanks” sentiment to the bottom right of the card.

These new add-on items can, of course, be used in conjunction with the Fairy Tale Florals Stamp and Die Set, here's a look at a card I made using all of the items together.

Fairy Tale Florals 3D Embossing Folder

15 October 2022

Monochromatic Halloween Peekaboo Pop-up card

Hey there crafty friends, today I am sharing a Monochromatic Halloween card that I am entering in to the current Lawnfawnatics challenge 134.

I started by stamping and colouring all of the images from the Fangtastic Friends Stamp Set, I chose to use greys with purple undertones. I added details with a white gel pen and then cut them out with the Fangtastic Friends Die Set.


Next I set about creating the Peekaboo Pop-Up. I cut all of the parts from 80lb Neenah Solar Crest cardstock, (if you cut from too thicker card, you will get issues with the card not closing properly.) I then added shades of purple Distress Oxide Inks to the background and to the hill. I added a die cut  black Spooky Fence to the hill.


I then used the Birch Tree Stencils to add the trees in black ink. I then started to add the die cut elements and build the scene. I kept one of the Bats to add to the moving arm. The sentiment was white heat embossed onto black card and trimmed before being added with foam tape. I added the bat to the moving arm and closed up the card. I thought it would be super cute to add the spider crawling along the front.


If you've not seen the Peekaboo Pop-Up, be sure to check out the videos from Lawn Fawn over on Youtube. The Intro to Peekaboo Pop Up can he found here Intro Video


04 October 2022

Altenew's Blooming Flower Bed Stencil - Product Focus

Hi there crafty friends, Terri here! Today, I am sharing a post focusing on the new Blooming Flower Bed Stencil Set.

I am sharing 3 ways to incorporate the stencilled pattern into your card making and as the seasons are starting to change I thought it would be fun to use an autumnal color palette.

Blooming Flower Bed Stencil Set Card Projects

The crisp dye ink pads I am using for all of the cards are Red JasperRhodoliteRaw Amber, and Green Opal. I love the warm cozy feel of these colors together.

All Over Stenciled Background

Blooming Flower Bed Stencil Set Card Projects

My first card uses the Blooming Flower Bed Stencil Set to create an all-over stenciled background.

I placed the stencil over a piece of Classic Crest Solar White 80lb Cardstock.  I added my chosen colors using a soft blending brush. I started with the leaves and used Green Opal ink. I then added the flowers with Raw Amber and Rhodolite Ink. I chose to use Red Jasper for the little dots and some white pigment ink for the centers of the red flowers.

Blooming Flower Bed Stencil Set Card Projects

I set the background aside to work on the sentiment, I thought it would be nice to use the More Than Words Stamp Set as it has a lovely soft feminine style.

I stamped the sentiment in Rhodolite ink onto a white piece of cardstock. I then added this to a strip of Forest Glades Cardstock and adhered it to my stenciled panel using my trusty Altenew Glue Tape.

I felt like the background need a little something so I added a few enamel dots from the Green Meadows Set to the centers of some of the flowers.

Eclipse Sentiment

Blooming Flower Bed Stencil Set

My second card uses an eclipse techniquewhere the sentiment is cut from the background, raised, and placed back.

Again, I started by stenciling the pattern in the same way I did for the first card. I cut the stenciled panel to measure 2.75″ by 5.5″.

I then grabbed my Caps Bold Alphabet Dies and added the dies to spell out “Hugs” in the stenciled panel.

I then ran it through my die-cut machine; making sure to catch all of the pieces as they came out. I then cut the letters twice more from white cardstock and adhered them all together to create thick faux veneer-style letters.

Blooming Flower Bed Stencil Set

I added the stenciled background to a piece of Forest Glades Cardstock and adhered it to an A2 notecard. I then added the letters using foam tapeI decided to add them with a slight drop shadow so that the green card below stood out more.

Next, I cut my sub-sentiment using the Sweet Sentiments Die Set and added it to the card. I love how the bold letters and the smaller ornate words juxtapose.

Focal Die-Cut Panel

Blooming Flower Bed Stencil Set

My final card uses a piece of the stenciled background left over from the previous card as a die-cut panel. (Waste not, want not as my Nan used to say!)

I cut the stenciled piece using the Nesting Slim Labels Die Set. I added it to a panel, which was embossed using the Forest Glades Cardstock and Garden Harmony 3D Embossing Folder. I cut it to measure 3.75″ by 5.5″ and then adhered it to a white A2 card base.

Blooming Flower Bed Stencil Set

I decided that the card needed a bold sentiment as there were a lot of “girly” florals going on.

After much deliberation, I settled on the Mega Label Love Stamp Set. I stamped the words “Happy” and “Birthday” onto a smooth white cardstock using Raw Amber Ink. I then placed them onto my card using foam tape.